Forensics: Genesis 1 component-mod
Darren Wershler and Ace
All images link to the Residual Media Depot Flickr pool. Click through for a more detailed look.
First Look
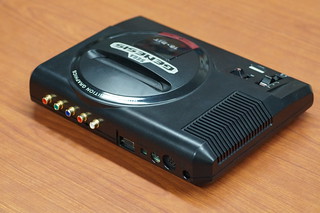 About a year and a half ago, the Depot acquired this Sega Genesis “High Definition Graphics” model 1 from a Montreal ebay seller, along with a pristine Sega CD model 2 and a base extender. What makes this particular console unusual is that it has a full set of gold-plated AV jacks added to the rear, for component video (YpBPr) and stereo sound.
This is probably a Sensato Kuro [real name: Sonny Benoît — an active modder ca. 2007] mod, though the seller couldn’t say for sure. (For comparison, see the pictures of the Genesis model 1 mods on his website.)
This sort of component mod is historically significant, but a rare sight for several reasons. First, all versions of the Genesis can output RGB video, which is the highest quality analog video signal. But due to the almost total lack of support for the RGB standard (or SCART/Peritel connectors, which utilized it in Japan and Europe) in North American home TVs of any vintage, few people in Canada, the USA or Mexico have ever been able to take advantage of this capacity. Doing so now requires investing in the custom cables, upscalers, professional video monitors and other equipment necessary for displaying RGB video. Component video, a close second to RGB in terms of analog signal quality, is far more common in North American TVs. (Though many contemporary HDTVs still have component jacks, most can’t process the 240p signal from a Genesis, so they still require an upscaler.)
In recent years, hardware component mods have become even more unusual because of the success of the HD Retrovision cables, which do all of the processing to convert RGB into component video in the cable itself, without the need to alter the original case in any way. General modding aesthetics call for as little cutting of original plastic as possible, and this mod requires the drilling of five separate holes, which can be especially difficult when dealing with old, brittle plastic.
The prominence of the RCA connectors on the back of the unit also could cause problems for anyone wanting to use a Power Base Converter, which has a lip that hangs over the back of the console. (The European Power Base Converter 2 doesn’t have that problem, but won’t work with games on cards). Solutions to this problem include cutting the Power Base Converter (again, undesirable), or using a cartridge slot extension, which might not work well, as it lengthens the path that the signal has to follow. (This is a moot point at the Depot, as the collection doesn’t yet include a PBC yet.)
Inside
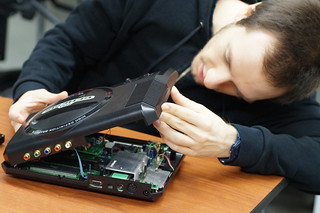 Opening a Genesis is relatively easy, as the case is secured with standard Phillips screws.
In this unit, the power LED wires were slightly squashed against the mounting post at some point, but work fine. This is a common problem, as these wires extend across the air gap between the top shell, where the LED is mounted, and the connection wire attached to the motherboard.
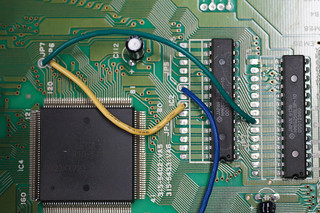 The top of the motherboard features several “bodge wires,” soldered point-to-point in order to fix factory defects on the board surface (the alternative would be making an entirely new PCB). These wires carry “enable” signals, which Sega’s custom chips generate, to the work RAM of the Motorola 68000, the console’s main CPU. Later Genesis revisions use a single 16-bit RAM chip, but to cut cost in earlier revisions, Sega used two 8-bit RAM chips for data from the CPU, one for the lower 8 bits, and one for the upper 8. The blue bodge wire connects to pin 20 of the lower 8 bits of RAM at IC2, which is its “chip enable” input. The yellow and green bodge wires are “output enable” for the 68000’s work RAM — the yellow for the lower 8 bits at IC2, and the green for the upper 8 at IC3.
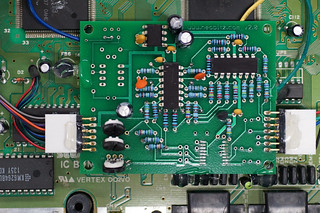 The heart of the component mod in this console is a Neobitz.com 2.0 video board, mounted with small amounts of hot-melt glue to the upper surface of the Genesis motherboard. Along with JROK’s encoder, this is one of the older RGB-to-component video encoder boards. It was made by JM (Jeff) Kurtz, who does modding and indie game development for the Neo-Geo (most recently, Knight’s Chance). The Neobitz 2 board was designed to add component, S-video and composite video output to the Neo-Geo. There was also a Neobitz-S board that only produced S-video. In a thread on the neo-geo.com forum archives (dated 07-26-2005, 11:06 AM), Kurtz (a moderator) wrote that “I’ve had a couple people tell me they have used it in a Genesis.”
This a relatively old modding technique. In absence of more precise information, it was probably completed around 2006, when the Neobitz boards were in common use. In 2019, a more likely method for a component hard-mod (if you wanted to bother) would involve installing an RGB bypass PCB like Voultar’s and then chaining the circuit to a component encoder board based on a ROHM video encoder with component outputs, such as the BA7230LS or the BA6592F (the former is more common).
The Neobitz board has three pots (potentiometers) for separate adjustment of the red, green and blue (RGB) channels … which his helpful, as the output from the system currently has a green cast on cartridge games and a blue cast on Sega CD games.
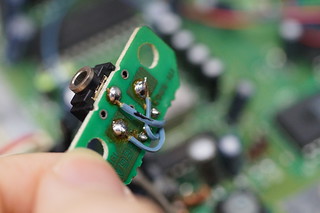 The audio connection for the Neobitz board has been tapped from the headphone out. Again, this is an older modding technique, which predates the recent practice of pulling audio from the pre-amp on the CXA1034 chip (Sony’s headphone amp chip).
The video encoder on the Neobitz board (which produced S-Video and composite video) has been desoldered and removed. As a result, some solder traces on the board show visible signs of damage from the this process.
As mentioned above, the modder used small amounts of hot-melt glue to secure the Neobitz board to the motherboard. There were also small amounts of glue on the connectors to provide “material support” for the soldered connections. Glue is not necessary to support proper soldering in most instances, but the glue was used here sparingly. As we wanted to look at the Neobitz board’s underside, we removed the glue quickly by applying a cotton swab soaked in rubbing alcohol.
We were particularly curious about where the Neobitz board was grounded. We employed a multimeter to determine the voltages used to power the board, as it appeared to be based off of a conversion circuit using two quad op-amps with positive and negative DC voltage (the markings on the chips have been scratched off). We also used it to identify a smaller chip we originally thought might be an LM1881 sync stripper (this chip is usually used to extract sync out of a composite video signal). We found that the Neobitz board generates -5V (actually measured closer to -4V) for the component conversion circuitry. This is interesting because the console itself only uses DC, and only uses +5V for the electronics inside. (There is an unregulated 9V rail in the console, though this is regulated down to 5V via two 7805 voltage regulators.)
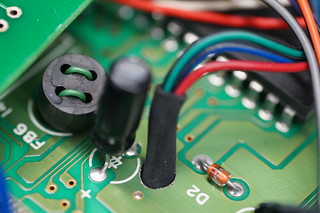 A hole has been drilled through the motherboard to run the RGB wires from the underside; the wires were protected from abrading against the edges of the hole with heat shrink. This is an odd decision, because the RGB could have been pulled straight from the RGB output pins on the video encoder on top of the board. Because this choice could potentially affect the signal, we decided to remove the motherboard to inspect the underside. One screw, which should have been beside the audio jack, was out of place.
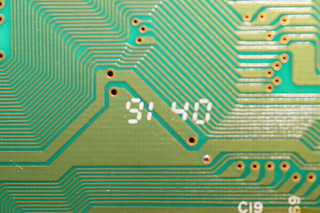 The underside of the motherboard is stamped “91 40”, indicating it was manufactured in the 40th week of 1991. This is a relatively old board for VA6, but is one of the later overall Genesis model 1 boards. What really interested us, though, was the state of those RGB wires.
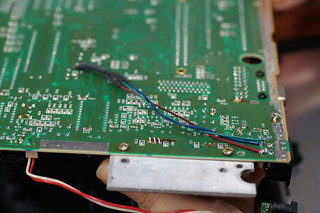 We found that the RGB wires running through the hole in the motherboard connect to the 8-pin DIN A/V output connector. The modder may have run out of wire, or short lengths of wire may have been supplied with the Neobitz board as part of the install kit, as there is a soldered and heat-shrunk connection in the middle of each of these wires.
We reattached the motherboard to the case, with all screws in correct positions, and then reattached the Neobitz board to it with 2-sided clear Gorilla Tape rather than more hot-melt glue.
We also made a note that the Chhsi and Taicon capacitors inside the unit will likely have to be replaced at some point, but are working fine at the moment, and show no signs of leakage,
After reassembly, we tested the console with the small benchtop Insignia HDMI TV in the Depot, via Monoprice component cables and an OSSC v1.6 (the unit with an HDMI connector rather than DVI). The OSSC was necessary because this TV won’t accept a 240p over its component input, though, oddly, it will accept 240p over HDMI. For testing, we used an Earthworm Jim cart. (Incidentally, this is one of the Genesis cartridges where there is an audio glitch; we will return to this during our audio-modding project) and Sonic CD. There was a visible green cast on the cartridge game, and blue cast on the CD game. We are waiting on the arrival of an oscilloscope so we can adjust the pots with the help of Artemio’s 240P Test Suite.
Conducted on Monday, February 4, in MilieuxMake, Concordia’s maker space (thanks, Ann-Louise!)