This post was written by Alex Custodio and Michael Iantorno as part of their ongoing research work at the Residual Media Depot.
We begin this post by situating videogames within the regime of planned obsolescence. We do so to challenge assumptions about our hardware’s lifespans and think about the legality of altering the objects we purchase.
The second half of this post is a tutorial on how to replace a Game Boy cartridge battery where we provide introductory basics, such as how to open the cartridge, how to determine the battery type, and how to solder the battery in place. The goal is to bring everyone into the conversation—no matter their familiarity with modding protocols.
Theoretical Background: Why Do We Do This Work?
Attitudes toward consumer electronics have led to a cycle of production, consumption, and neglect that leaves us with the increasingly pressing issue of electronic waste (e-waste).¹ Planned obsolescence—the notion that all consumer objects have a predetermined end date—is hardwired into our devices.² Even if we purchase parts to fix our broken electronics, most of us wouldn’t know how to go about doing so, since the device’s internal mechanisms are unknown to us.
We refer to this practice of concealing the machine’s inner workings as the “black boxing” of technology. Our electronics receive input and disseminate output without our understanding of what’s actually going on within. Companies intentionally engineer objects as black boxes so that, when they break, we can’t repair them. Most of the time, we don’t even know why or how they broke. Instead, these companies tell us to simply buy a newer, better box—even though this one will be equally inscrutable. Meanwhile, the e-waste piles up.
While our work at the Depot is primarily concerned with home computing devices and videogames, these arguments apply to a wide variety of professional and consumer goods. Many of us lament that household items, from toasters to cell phones, are impossible to open, let alone repair. Efforts to fix an item through official means (such as through a retailer or manufacturer) are commonly rejected or, alternatively, result in the complete replacement of an item. At the industrial level, devices such as trucks and tractors are increasingly loaded with embedded software that not only discourages repair but fully prevents non-authorised entities from attempting repairs in the first place. Thus, there appears to be a shrinking potential in the current commercial milieu for easy-to-access repair
The gaming industry thrives on the black boxing of media. Monoliths like Nintendo harness the obsolescence of their own products to sell us the same game across mediums and platforms. We see this most clearly in the porting of Game Boy, Game Boy Color, and Game Boy Advance games onto their Virtual Console service. Game consoles rely on a generational logic that presumes consumers won’t care about their hardware 5-10 years after its release (at which point they generally stop supporting it). Without proper support, most users will simply resign themselves to abandoning a device once a single part of it fails. This is exacerbated by the decline of support and availability for complimentary devices—such as the disappearance of CRT televisions for old videogame consoles—forcing such activities into the domain of hobbyists and third parties, if at all.
Volatile Memory: How Does Game Boy Saving Work?
This post is called volatile memory because many old videogame cartridges, including Game Boy carts, require power to maintain their save files. Volatile memory is essentially computer storage that only “remembers” data while the device is powered.
Before Nintendo switched to cartridges that used flash memory or electrically erasable programmable read-only memory (EEPROM) to store save data, handfuls of Game Boy and Game Boy Advance cartridges relied on static random-access memory (SRAM). With SRAM, the save data is mapped onto the usable memory for the game. When it comes time to save, the game’s program writes data into this area, with the understanding that it will be there on the next start. The Game Boy, for instance, reserves the memory addresses hex $A000-$BFFF for on-cartridge RAM and, thus, the save data is located somewhere in this range.³ The power from the battery—usually a small CR1616 or CR2025—guarantees that it will be there when next turned on.
The small batteries in the cartridges have a life expectancy of between ten and twenty years, depending on use. Without a functioning battery, powering down the handheld erases the game’s save data (or the clock and all time-based events, in the case of Pokémon)–even though the game itself still otherwise functions. This dramatically changes the gameplay experience.
Once the battery dies, there’s no way to recover save data without extracting the save file. But it is possible to extract save data from a Game Boy cartridge as a small computer file, by using software that “dumps” the memory range from the cartridge. We have such a device at the Depot. Thus, we can extract our save files, replace the battery, and then write the save file back to preserve it for another decade.
Barriers to Entry: Why Don’t We Repair?
Nintendo wants us to fix this problem by buying a re-release for a newer system or licensing a digital download on their Virtual Console or Nintendo Switch Online. But what if we just fixed our cartridges ourselves? A battery costs around $2.00, and replacing it is quick and easy with the right materials. So, what holds us back?
We identify three main reasons why we might be apprehensive about opening up our electronics to maintain or repair them:
Expertise
We are hesitant to repair these devices because there rarely is a straightforward manual that tells us how to do it! Usually, we have to search online for resources (which are not always easy to find). When we do find instructions, they’re often missing key bits of information that their authors take for granted.
Most guides are written by individuals who have at least some knowledge of electronics, circuits, soldering, etc. This is sometimes intentional (geek gatekeeping designed to prevent certain groups from entering community) but is usually an accidental oversight. Either way, it prevents beginners from even starting.
Fear
We can be afraid to tinker with these old videogames for both economic reasons (some of them have become quite valuable) and nostalgic ones (many are essentially family heirlooms or personal treasures).
These fears are legitimate. However, for games or systems where the warranty has expired decades ago an unusable game will be unusable whether we repair it or not. We try to rationalize through the fear. If the object we’re trying to repair is broken and languishing in an attic, it will be no worse off if we do break something while trying to fix it.
Parts and Tools
Knowing which parts to use, finding a place to source them, and getting access to the necessary tools can be difficult. Many big cities have dedicated retro-gaming stores, but these are hardly commonplace, and they are less interested in teaching technique and more interested in selling a service or product.
A lot of the equipment necessary for the repairs, such as the soldering irons and filters, are expensive and they require space to set up. We’re lucky to have access to a makerspace with excellent ventilation to be able to host these kinds of workshops.
Tutorial: Replacing Your Game Boy Cartridge Battery
This tutorial walks you through the process of swapping a battery on a Game Boy cartridge. This basic workflow applies to most retro games, but make sure you use the right kind of batteries.
Note that, without a Retrode or similar device to dump your save file, removing the battery from your cartridge will erase your save file. Proceed with caution.
Step 1: Gather Your Tools
You will need:
- Your game cartridge
- A 3.8mm screwdriver security bit (to open the cartridge)
- A replacement battery with tabs for soldering. You can find these at most videogame repair shops online.
- Tweezers
- Soldering iron (we found a flat head worked best)
- Solder
- Wire sponge
- Optional: Solder wick or a desoldering pump
- Optional: Flux
- Optional: Vice (“helping hands”) to clamp the board
Optional materials make the process easier, but we successfully replaced the battery without these materials.
Ensure that you have appropriate ventilation, especially when working with lead solder. These boards are old. Even if you’re using lead-free solder, the solder you’ll be heating on the board contains lead. Turn on your ventilation before you remove the soldering iron from the holder. The vent should be as close to your circuit board as possible to prevent the fumes from reaching you.
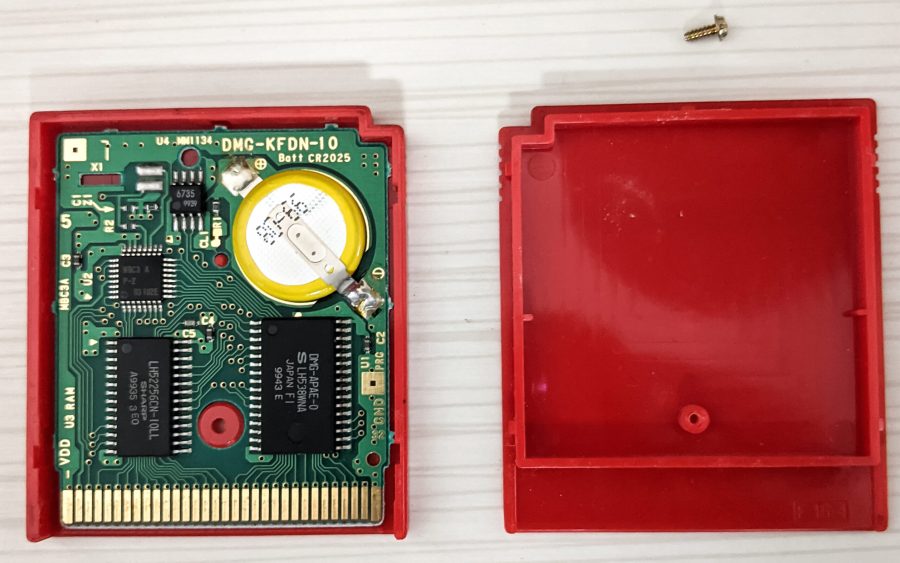
Step 2: Open the Cartridge
Use the 3.8mm security bit to unscrew the cartridge. Place the screw somewhere safe and out of the way.
Side the plastic backing up and place to the side. Remove the mainboard from the casing and set it aside away from the soldering iron.
Do not solder with the circuit board in the plastic case!
You can optionally clamp the circuit board in a vice (also known as “helping hands”) but be careful not to scratch the board when clamping.
Step 3: Desolder the Battery
The battery is soldered to the circuit board in two places: the positive terminal and the negative terminal. Gently heat the top tab with the soldering iron while using the tweezers to pull the tab away from the board.
Take care not to heat the board too much and only touch the iron to the soldering pads. You can use solder wick or a desolder pump to remove the existing solder if necessary.
Do the same to the bottom tab until you can remove the battery. It should come off easily.
A Note on Old Cartridges
Some of the old batteries were sealed using Kapton tape, which is used to insulate electrical components on circuit boards. Now, decades later, these materials have dried out. In some cases, you may need to scrape this residue off the solder pads before you can heat the solder to remove the battery. If you do so, be very careful not to scratch the circuit board and make sure to remove any dust before you solder the new battery and close the cartridge.

Step 4: Solder the New Battery
Solder the new battery in place by first heating the solder and then setting the tab on it. Add additional solder to secure it in place. If you used a desoldering pump or solder wick to remove the old solder, tin the tabs by placing fresh solder on them before soldering the battery tabs down.
Be attentive to polarity! The tabs need to be connected to specific solder pads to complete the circuit. New batteries usually have the positive terminal labeled. Make sure that you solder the positive tab to the positive terminal.
Note that your circuit board may look different if your cartridge uses a CR1616 battery instead of a CR2025 as pictured. Always refer to the polarity indicated on the board.

Step 5: Close and Test the Cartridge
Once the solder has cooled, check that the battery is secure before reassembly.
Make sure there’s no dust or dirt on the board and place it back in the plastic case. Slide the cover back into place and tighten the screw.
Now, enjoy your battery-powered saves and clock functions!

References
¹ Parks, Lisa. “Falling Apart: Electronics Salvaging and the Global Media Economy.” In Residual Media, edited by Charles R. Acland, 32-47. Minneapolis, MN: University of Minnesota Press, 2007. 36-37.
² Hertz, Garnet and Jussi Parikka. “Zombie Media: Circuit Bending Media Archaeology into an Art Method.” Leonardo 45, no. 5 (2012): 424-430.
³ Parks, Mike. Quora. 2020.
Acknowledgements and Resources
The contents of this post were first presented as part of In the Middle, a Chimera, the end-of-year symposium at the Milieux Institute for Arts, Culture and Technology at Concordia University. We would like to thank Stephanie Creaghan for coordinating the event.
If you’re interested in repairing all sorts of different devices, we highly recommend the ifixit website, as they have tools to purchase and tutorials for many different devices.
If you’re looking to source parts for your videogame repairs, check out retromodding.com. We used their batteries in our workshop to great success!
Stay tuned for an announcement for another workshop in the fall where you can bring in your old Game Boy games to repair them with us in the Makerspace!
Authors
Alex Custodio is a SSHRC-funded PhD student in Concordia University’s Humanities program whose doctoral research focuses on how global communities of users modify and repair handheld videogame platforms.
Michael Iantorno is a FRQSC-funded PhD candidate in Concordia University’s Communication program. His doctoral research explores videogame afterlife, fandom, and intellectual property law, and he primarily studies communities of maintenance related to Super Nintendo hardware and software.


[…] put together an excellent blog post that summarizes our presentation, which is now available on the Residual Media Depot blog. We’ll likely run this workshop again in the future, so if you’re interested in […]